Composition
Composition is nothing but how an image is designed by the photographer.
Depending on the composition, the same image can look dramatically different
in the photograph. Wrong composition is the main culprit when a very beautiful
scene turns out to be quite mundane in the photograph. On the other hand, a good
composition can make even an ordinary scene come alive in the photograph.
An imaginative photographer can provide a very different view of the world by shooting a
familiar scene with an innovative angle.
Following are some of the tips for good composition
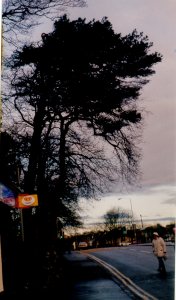
Avoid unnecessary objects in the frame
|
While composing a picture, it's very important to decide what exactly you want to depict
in the picture. Remember that the foreground and background of the picture are as important as the
subject itself. The human eye and brain are used to "filter out" the unwanted details
from a clutter of many objects and to see the right image. However, a camera records
everything it "sees" in a frame. This causes many obstructive and insignificant objects
stealing the viewer's attention in a picture frame.
In the adjoining image, see how the red sign on the tree trunk gets the first
attention, altough it's an unnecessary element in the frame. The sign grabs
even more attention, because it's painted in bright red and yellow colors.
Remember that bright colored objects always grab first attention in a picture.
So before you click the picture, make sure that there are no unwanted bright
objects inside the frame.
|
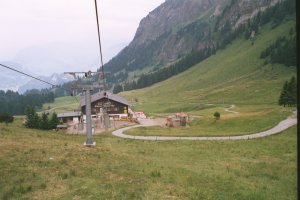
Create feeling of depth using foreground objects
|
This photo on the right was shot from a cable car. In this image, the
cables in the foreground create a feeling of depth. The angle of the
cables creates a dynamic effect, drawing the viewer's attention to the
house in the distance. The winding road and the diagonal mountain peak on
the right create similar effects to draw viewer's attention.
Had the cables been in the centre of the picture, the picture would have a
totally different effect.
|
|
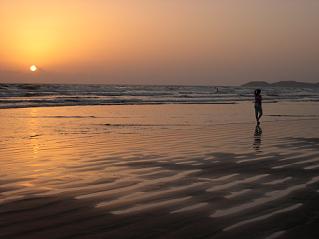
Experiment by keeping the subject to one side of the frame

|
In this image on the left, I put the subject on one side of the frame. This
is different from the normal convention of putting the subject in the centre.
In this image however, the background was as significant as the subject herself.
Imagine how the image would look if the subject was in the centre of the frame,
obstructing the long winding road behind her!
|
Caution: By default, all cameras focus on the centre of
the frame. So keeping the subject in the side / away from centre may render it
out of focus as shown in the picture below.
|
You can do one of the following to eliminate this problem
1. Do the focusing manually: All SLRs, and some of the advanced digicams have this feature.
The lens can be operated manually, where the user can actually focus the lens with
his/her hands, overriding the default motor in the lens.
For most point-and-shoot camera users (film and digital alike), sorry, this facility is
not available in your cameras.
(A word of caution: Before revolving the lens with your hand, make sure the toggle switch
provided on the lens / camera for switching between manual and auto modes is set apropriately.
If you try to handle the lens manually while it’s set to auto mode, it can seriously damage
the lens. And lens is THE MOST EXPENSIVE part of the camera.)
|
|
2. Use the ‘half click’ facility of the camera to focus: Most of the cameras available in the market
today provide this facility.
It requires a little bit of skill on the user’s part, though.
Point the camera towards your subject, gently click the shutter release button. DO NOT PRESS THE
BUTTON FULLY. Press it ‘just’ enough. You will sense this ‘just enough’ thing, when you see the
focus freeze on the centre subject, the whirring sound of the lens motor stop, and some cameras
will even make some beeping sounds. Some cameras give a visual indication by showing some green sign
on the screen/viewfinder.
Once this is done, it means the camera is properly focused on the subject in the middle of the frame.
Now move the camera such that the main subject if placed wherever you wish. Remember, you have to move
the camera without letting go of the button, and without pressing it fully. This requires a little bit
of practice. But it’s not too difficult to master. Owners of the film cameras, it’s best
to practice this technique before you load any film in the camera.
|
Shoot a routine thing, but from a different perspective
|
This picture shows the extreme close up of a patch of FUNGUS on the sea
beach. The extreme close up renders the fungus in a totally different perspective,
allowing the viewer to see all the intricate details of its shape.
By tightly composing the picture and keeping the unnecessary details out, the
photographer makes the viewer focus on the main subject.
|

|
Use silhouttes to dramatize your photographs
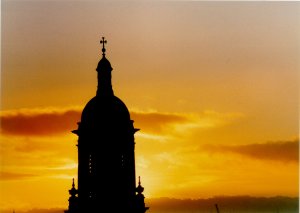
|
This picture shows how the use of a silhoutte (a dark figure against a brightly
lit background) can dramatize a picture. This technique is particularly effective,
when the background holds more importance in the picture. The dark figure in the
foreground adds a depth and character to the photograph.
The aim while photographing this picture was to depict a sunset, which is more
important than the tower in the foreground. But the dark figure of tower adds a new
dimension to the picture. Imagine the picture without the tower, and you will
appreciate how listless the picture would look, inspite of all the bright colors of
the sunset.
|
The following 2 sunset pictures show how including a human in the picture adds a certain character
to a scene which is already oozing with colors. The picture on the left shows a sunset without human
in picture while the one on the right shows same beach with a human silhoutte.
The rule of thirds
Whenever you compose a picture, try to mentally divide the frame into 3 equal parts horizontally
and vertically. If you place the main subject someplace where horizonal and vertical lines intersect,
the picture will have more impact. Sounds complicated? But it isn’t. Here’s how

|
In this picture, the main subject is slightly away from the centre of
the frame, as indicated by a grid. This has added a bit more interest in the frame.
To verify this, cover the rightmost empty part of the image with your fingers, and
see how the picture looks.
Placing the subject a little away from centre almost always adds an
element of interest to the frame
|
|
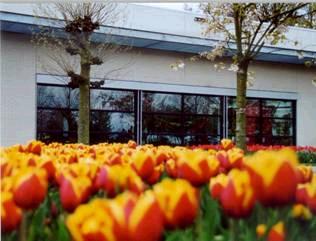
This picture shows how the rule of the thirds can dramatically influence an image.
Since the sky had a dramatic cloud formation, I decided to give the 2/3rd part of
the image to the sky. If the sky would be grey or bland, I would give it only 1/3rd
space in the picture
|

|
Breaking the rule of thirds!!
Some pictures look better when placed in a symmetrical way, as the one below.
It shows the reflection of these beautiful diwali lamps floating over water.
Imagine this as an asymmetrical picture. It won’t look as good, will it?

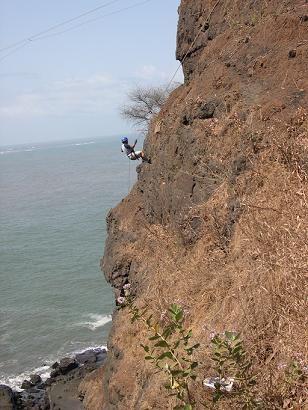
Adding the sense of scale using human element
|
Putting a human being in the picture adds a sense of scale. Imagine the picture on the right without
the rappeling man. The rock would not make much sense in terms of it size, if the human being wasn't
present in the picture.
The human mind finds it easy to sense the scale of things, when it's compared with the size of a
human body. So the pictures of big buildings, bridges, vehicals etc should always contain humans
to indicate scale.
|
|
Back to Photography Basics
Back to Photography
Back to the Home page